Stained concrete as flooring used to be rare, and a trend flooring option. In the last decade, it has exploded onto the market and has achieved a firm acceptance by homeowners, builders, architects, and designers.
Acid stains create a unique look giving concrete visual character which cannot be achieved by using a conventional polymer or pigment type stain. When placed on a cementitious surface, the single component coloring solution of acidic metallic ion particles (acid stain), chemically react with the particles in the cement (free alkali) to form oxides. Typical paint or coating stains cover up the concrete, while chemical stains infuse the color into the surface to become a permanent part of the substrate which will not crack, chip, fade or peel. The resulting effect creates a translucent, variegated effect, showcasing the character of the substrate. Depending upon the cement content, age, porosity and manner in which hydration took place, the chemical stain will react differently every time. These variables cause broad drifts in color and mottled surface effects which are not considered defects, they are the reason for it’s inherent beauty.
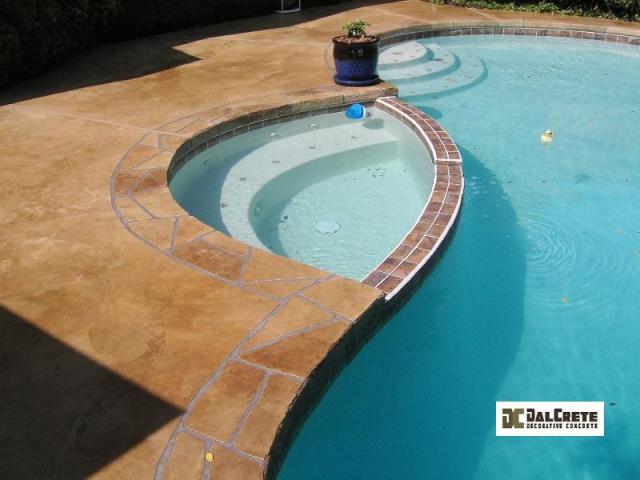
Acid stains transform your concrete into a rich and inviting surface that can fit into virtually any design plan. Available in a warm palette of earth tones, adding scored designs, multiple colors, and unique staining methods can produce a showpiece upon which any decorating style will blend.
If you are a builder or are planning to build a new floor please click the following link to know about the do’s and don’ts for good stained concrete.
A word of caution on interior stained concrete: Many concrete slabs are flawed from carpet tack strips, tile mortar, non-removable stains, previous coatings, or are just poorly finished. These slabs are not likely to provide the beautiful finishes commonly seen in photos here and elsewhere.
However, with a low cost concrete overlay placed after proper surface preparation, the professionals at Dalcrete can provide you a restored concrete surface tailor made for our stained concrete finishes. Our concrete overlays are hand finished with techniques designed to mimic the burnishing of steel trowel and power-trowelled concrete to give rich variations just like new concrete slabs.
Considerations When Selecting Acid Stain Colors
When choosing Acid stain as
a color choice and finish for Concrete it is necessary to be educated
on its limitations. The end user should be aware that the basic
principles which make Acid Staining so beautifully mottled, variegated
and marbleized can also cause some undesirable results.
Un-reacted
Acid Stain in its packaging is often a translucent color that does not
represent the final color that the concrete surface will become after
the reaction and finishing takes place. Many tan and amber Acid Stain
colors come out of the package a light green color, and black is
generally anything but.
The final color will not be evident
until the Stain has completely reacted with the cement substrate. The
reaction takes place over a period of 1-8 hours (depending on the
manufacturer). Additionally, the color when dry is usually altered to a
deep wet look coloration with the application of solvent based sealers,
though a water based sealer can maintain the soft look of the acid Stain
when dry.
Acid Stains add translucent colors to the concrete
surface and do not hide the imperfections of the concrete. Flaws from
poor finishing, carpet tack strips holes, tile mortar, non-removable
stains from oils and other items, previous coating removal marks – even
shadowing from VCT and tile grids – will not disappear.
Any
undesirable blemishes or imperfections should be addressed prior to
stain application. We will help you to determine which ones may be of
concern and propose a remediation.
Application hazards and
variations in the surface generally blend in or simply add to the
variegated look and feel desired when choosing the natural marbling
effect of direct concrete stain.
Color charts should be used as a guide only. On request an onsite mockup can be created to determine final color, or in case of overlays we can create a sample.
Color
varies depending on surface porosity and texture, concrete composition
and age, preparation and application techniques, number applications,
dilution rates, and other factors.
We have extensive experience
with acid stains from most manufacturers, because of their consistent
quality and reliability we prefer to work with:
| Chem-Stone® (see color chart) | Chem-Coat® (see color chart) |
| Kemiko® (see color chart) | Scofield® (see color chart) |
| Cohills ProSeries® | Cohills Earthtone® (see color chart) |
| Düraamen® (see color chart) | DCS® (see color chart) |
Acid stains are permanent they cannot be easily removed, color will not fade, chip, crack or peel and wears only as the concrete wears.
Acid stains do not hide surface blemishes cracks or construction errors. No matter how discolored the concrete, many blemishes or variations will only add to the character of the finished floor.
We serve Dallas, Plano, Frisco, Mckinney, Allen, Lewisville, Grapevine, Arlington, Grand Prairie, South Lake, Flower Mound, Rowlett, Rockwall and the entire DFW Metroplex.
Considerations for Builders:
When putting together a
construction schedule it is often understood that ‘concrete work’ is
performed at the beginning of any project. Concrete Staining is not
‘concrete work’ as much as it is ‘finish work’ and therefore should be
scheduled to commence after the painting stage, prior to finishing work.
However, some builders prefer to schedule any concrete scoring
the day after the pour. This allows score lines to continue across
rooms once walls are erected. If scoring is done after framing, score
lines are normally terminated into a border scored 6″ to 8″ from the
walls.
Highly experienced builders prefer to stain concrete at
the early phases of construction, during the “Pre-Finished Stage”
(normally 14 days after pour). The advantage of this approach is that
the stain and seal protect the concrete from damages from other trades.
However, this requires a strong management to hold accountable other
trades when damages are done to the finished floor, and to keep them
from damaging it in the first place.
Dalcrete recommends to
stain and seal after framing and roofing are finished. The more trades
we follow, the more the quality of the floor suffers. However, this
will require a firm commitment to the floor from the builder, other
trades, and even the client.
Regardless of when the
work is to be completed, some basics will hold true for everyone. A new
concrete surface is a virgin canvas, and while it is ready for our
stain, it is also ready for any other, most of which will not add to the
final look. As such, caution needs to be taken during every step of
the building process.
When placing the foundation and ordering
concrete, it is important to ensure your concrete supplier and installer
understand that the concrete is intended as the finished floor. Use
a minimum 5 sack mix (3500 PSI), minimal to no fly ash. No surface
curing compounds should be used, and calcium chloride accelerators are
an absolute no.
On interior surfaces, the concrete
should be power trowelled to a hard, slick finish to achieve a polished
marble like appearance in the stain. It is not necessary to burn the
floor. Any unreachable areas must be hand finished to a high standard –
steel trowelled to a slick finish where the power trowel cannot reach.
On
exterior surfaces, a light or medium broom finish is recommended to add
slip resistance, (though sealer additives can add resistance for
smoother finishes) or if you want a fossilized, limestone-like finish
for the surface, apply a medium to heavy rock salt. In addition,
texture stamping is a great solution for stained concrete and is always a
recommended upgrade outdoors. Outdoor slabs to be stained should not
be driven on under any circumstances until well after we finish our
work. The requirements and cautions given below are just as important
for an outdoor slab as for the interior foundation concrete.
When framing, it is very important that the framers remember several items. One – never brace the frame to the inside. Two
– never stage the lumber and sheet materials on the slab. Resins,
tannins, and even waxes from the lumber will leave shadow effects
outlining where the material was placed. Three –
chalking and marking should be kept to a minimum. Do not use red chalk,
it is a permanent dye and very difficult to remove. The only colors to
be used are white or blue chalk as they are not permanent dyes, and
even they should be used sparingly. Do not use grease pencils, and only
make light markings with regular pencils. Whenever possible, make
notes on the framing itself. Four – cut away base-plates carefully and cleanly as soon as possible from all doorways. Five – pick up all nails and rust producing items when dropped.
Items
for everyone on the site include primarily, a need to work clean. No
solvents, markers, wax or grease pencils should be used to mark the
slab, and only appropriate chalk colors. The floor must be protected
from gouging and chipping – dragging heavy items or dropping items from
ladders or above is not acceptable. The floor should be protected from
adhesives, caulk, gas, solder, flux, oils, PVC primer/cleaner, PVC
adhesive, metals and rust producing items. Do not leave lumber,
sawdust, sheet materials, plastic, nails or other items on the concrete –
clean as you go! Otherwise variations in moisture and
curing rates, surface porosity and staining will lead to undesired
color variations. Lastly, do not eat or drink while on the slab! Find a
room that will not be stained and move there. That is also the best
place to stage materials when available.
Use drop
cloths where needed. Floor must be completely protected during primer,
paint, stain, or lacquer stages. Painters may use blue tape and craft
paper taped to the wall to protect the edges and tarps to cover the
field. Trim painting and touchup must be done by a professional who can
keep it off the floor. We in turn will protect their work whenever
necessary.
When acid staining is done at the Pre-Finished Stage
your finished floor will require some level of protection during the
rest of construction.
The best way to protect your
investment is by covering the surface after we have applied the sealers.
Be sure to inform all subcontractors to treat the floor as a finished
product. Here are some different levels of protection you may require:
Low Traffic – Light Residential:
Place
rolled cardboard over the entire surface making sure not to tape to the
concrete itself. (Some tapes, even ‘painters tape’ can adhere to
freshly cured sealers and make for undesired outcomes.) Tape the paper
to itself and then use Masonite or OSB (Oriented Strand Board) to help
hold down the paper in doorways and high traffic areas.
Medium Traffic Areas – Light Commercial:
Use
rolled cardboard taped to itself covering the entire area. Use
Masonite or OSB over the entire area for complete protection.
High Traffic – Maximum Protection:
Use Breathable inexpensive carpet turned upside down, and then cover entire surface with OSB.
Once
the construction process is nearly complete, we will return to remove
the protective coverings, clean the floor, touch up any small items,
(damages will be billed repairs) and apply our final floor finishes in
preparation for handoff to the client.
Dalcrete can work either
at the Pre-Finished or Finished stage, in both cases floors should be
clean and empty prior to our arrival. Do NOT use acids or chemicals to
clean. We include in our projects a maximum of 1 man hour for
incidental cleaning or moving items. After the first hour charges will
apply per man hour at Dalcrete rate (not at a cleaning crew rate). This
helps ensure we can honor our time commitment to you as well as the
projects for other clients scheduled after yours.